19 June 2014

Mass Production Madness


We are getting closer to the end of the school year, and our move from London to Singapore, so we decided to have a farewell party for the girls and their friends.  I spotted this absolutely adorable tutorial on making a travelling pencil case on Ikatbag, and thought it would make a lovely party gift.

Image Source - Ikatbag ©

I liked the way the pencil case could be unzipped, folded down, and would then stand on a table with the pencils or markers ready to grab.  So much better than digging around in a standard pencil case, trying to find the right colour, or having them roll out of the case, and fall down the sides of car seats and aeroplane seats.

As always, LiEr has provided brilliant step-by-step instructions, with loads of photographs, and was kind enough to answer my questions so I could draft a template.  These are the measurements I used (my PowerPoint skills aren't fabulous, so you'll have to imagine a gentle curve on the top of the lining fabric and template plastic pieces).


These measurements include a 1.5cm (half-inch) seam allowance.  I dug through my supplies at home and found everything I needed to make a sample pouch.  I spent the better part of a day slowly making a case, using the instructions provided.  It was much harder than I expected, and sewing in the base panel was a complete cow.  I couldn't get the edge to align nicely along the sharply curved base, the fabric of the base panel that I had already sewed together kept pulling the base away from main section as I was trying to sew it, and I nearly broke my machine when it got thoroughly jammed.

After making the sample case, I decided it would be crazy to try and make a bulk batch.  Unfortunately the girls had other ideas, and begged me to have a go.  I relented, and started making a list of everything I needed.  I made a trip to Walthamstow on Monday to pick up supplies as cheaply as possible.  I found these items there:

  • 28 separating zips (slightly chunkier zips, that you'd use in a zippered sweatshirt)
  • 2m of batting/wadding
  • 2m of polycotton fabric
  • 1 roll of invisible thread
  • 15m of 1" grosgrain tape (I got black and purple, because they ran out of black)
  • 2m of 1" webbing
I also made a trip to Ikea and bought a couple of metres of Akerkulla fabric.  It's a medium weight furnishing fabric and is an ideal weight for pencil cases.  It also has the advantage that it can be coloured in with fabric pens if you want to brighten it up.

Image Source - Ikea ©

I also needed enough template plastic to create the stiff section in the bottom of the standing pencil case.  Unfortunately, template plastic sells for about £3.50 for two A4 sheets, which is only enough to cut four panels.  After a trip to my local craft store, I found some clear acetate sheets, at less than half the price. 

I had to make 28 pencil cases, and I had five days to get them done.  I sewed until midnight two nights, and through a large part of the days.  It was completely mad, and I was exhausted by the end.  I've included a couple of pictures of my work in progress.


I worked by cutting all my pieces out at once.  I even measured and cut my grosgrain tape and webbing pieces, and used a burning candle to melt/seal the cut ends.  I then sewed the same section on every piece, just like a production line.  These were the steps:

  1. Sew the main panel to the batting.
  2. Sew the small plastic pouch section on top.
  3. Sew the plastic inside the pouch.
  4. Baste the zip in place.
  5. Pin the zip ends.
  6. Sew the outside fabric on top.
  7. Trim the corners and turn inside out.
  8. Top stitch the outside.
  9. Cut the zip and add the webbing.  

It was a tiny bit fiddly as I had a rainbow of colours and had to keep changing thread.  Fortunately my new machine has one of those nifty needle threaders, that makes up for my terrible eyesight!

Along the way I figured out a few tricks to make the job easier.

Tip 1 - Sew an extra line of stitching just above the basting stitch on the bottom of the main panel.  This will stop the plastic, from sitting too close to the bottom seam, and making it really hard to turn the section inside out and top stitch it.  I've included a photo, which might make this a bit clearer.


Tip 2 - Once you have cut your excess zip off, pin the two sides of the zip underneath so that the section you have to sew inside the webbing is a bit smaller than 1" wide.  Again, I've included a photograph.


Tip 3 - Don't use a zipper foot for basting the zip, or for sewing the main fabric onto the liner fabric/batting/zip section.  You want that stitching to be far away from the zipper coil as possible, so you have lots of exposed tape on either side of the zip.  This will make it much easier to unzip the finished pencil case.  I just used my regular presser foot, and pushed it close to the zipper coils, and sewed around the zip for the  basting.  When I sewed the main fabric to the liner section, I just moved my needle slightly closer to the zipper coils, so that the final stitching line was inside the basting line.

Tip 4 - You can't iron acetate!  It just goes all bumpy and strange.  Don't even put an iron near it, or you'll ruin all your hard work.

Tip 5 - Use your edge stitching foot to do the top stitching.  I tried to go slowly and push my fabric up closer to the guide.  It resulted in much neater top stitching.

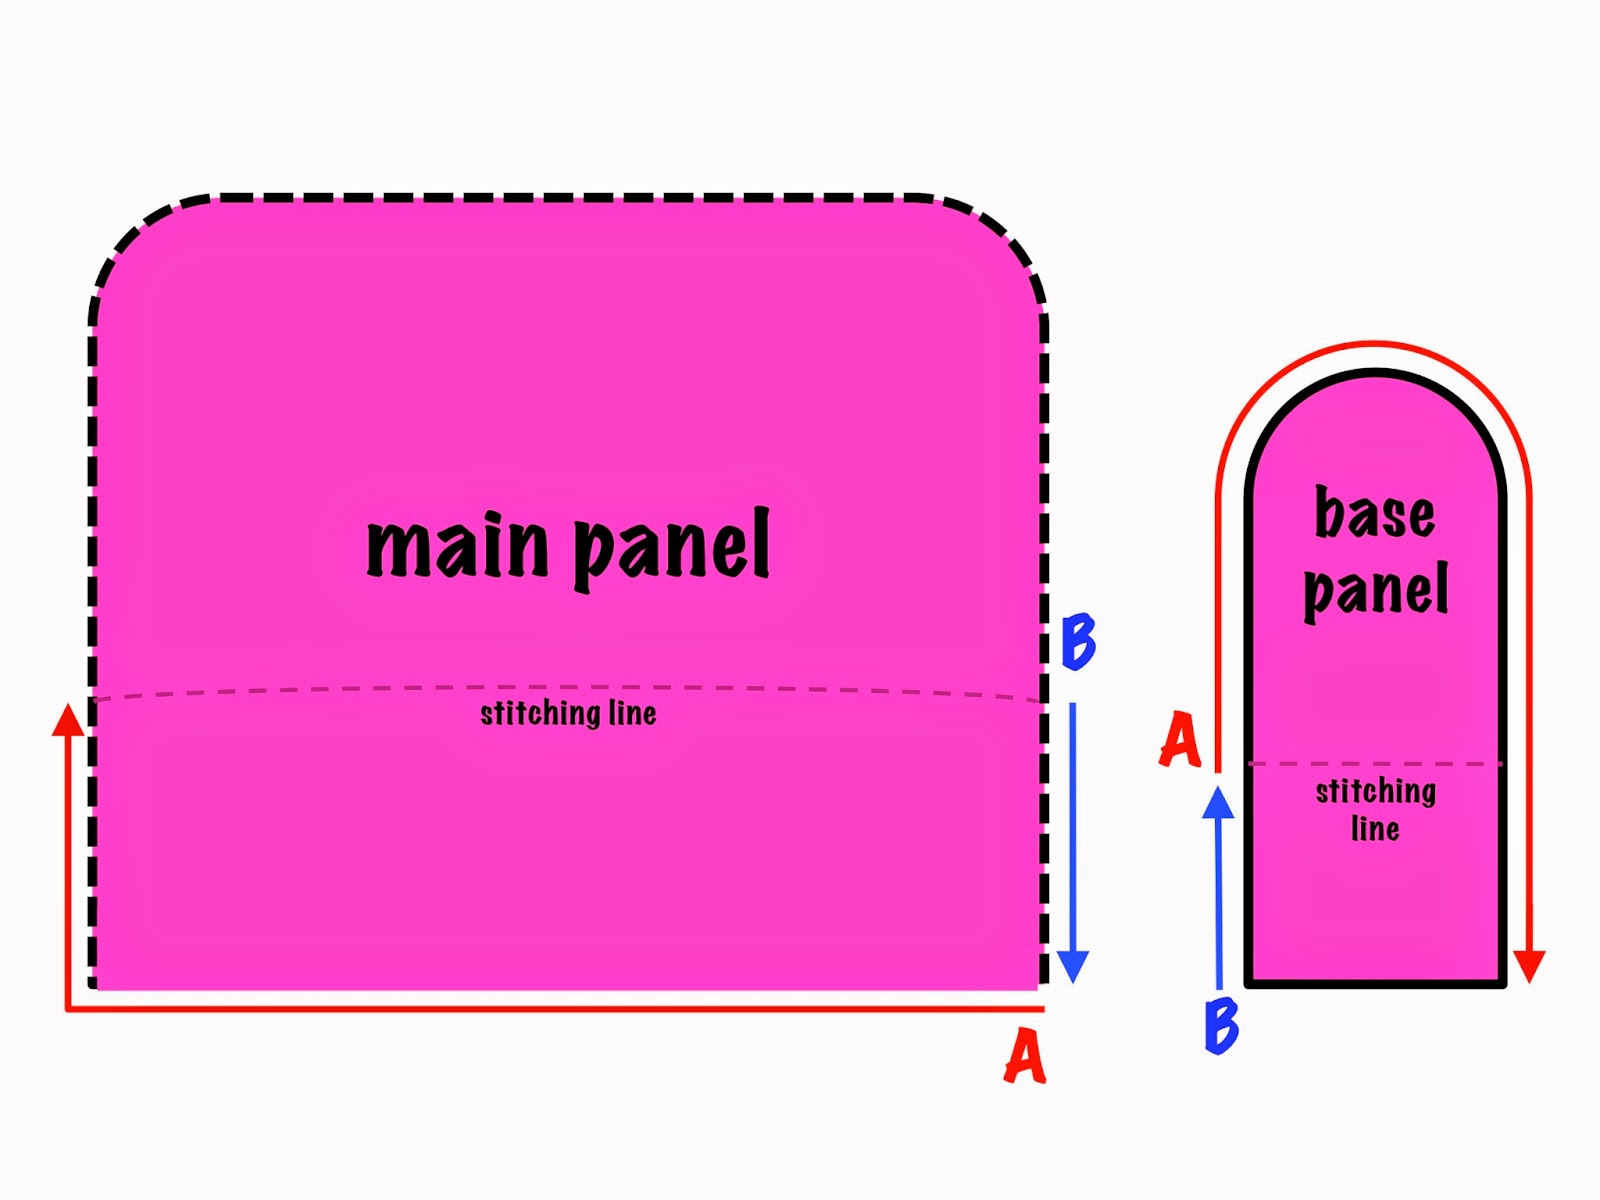
Tip 6 - When you are sewing in that base panel sew the base panel in along the bottom and left edge of the main panel, then go back and sew the right edge of the panel.  I've made a diagram that hopefully shows what I mean.  You align and sew edges A (red) together, then you align and sew edges B (blue) together.  By leaving that right edge when you sew in the base panel, you can manoeuvre the stiff plastic and fabric section through the machine nicely, without the base panel constantly pulling the two sections apart.  I also took LiEr's advice, and used invisible thread in the bobbin, so that the second stitching line was not as noticeable.  I also only used a pin to secure the start point of each stitching section, and carefully pulled the fabric into place as it rolled through the foot.


Tip 7 -  When you are aligning the grosgrain tape edge of that base panel with the main panel, hold the tape edge slightly inside the edge of the main panel.  This will ensure your stitching is very close to the edge of the grosgrain tape, which will help to keep it away from the zip.

I hope those tips are useful for anyone else making this pencil case - or some totally demented, mass produced number of them.

Here are a few pictures of the finished pencil cases in all their rainbow coloured glory.


We popped a thank you note, balloon and a couple of packets of sweets inside the pencil cases.  They were a huge hit with all our guests.  I believe almost everyone turned up at school on Monday with their brand new pencil cases.  I'm really glad I made them, even though it was jolly hard work to get them done in such a short space of time.  I've also got my technique worked out, and I think I could make one from beginning to end in a couple of hours.  

If you're thinking about having a go yourself, I would say go for it.  But make sure you give yourself plenty of time to get them done.  
read more "Mass Production Madness"

18 June 2014

Junk Drawer Tidyup


Sometimes it's the small organising jobs that make a big difference at home.

Last week I was digging around in in my kitchen junk drawer trying to find something, when I decided that it had finally got too messy.  Every random bit of stationery, ear plugs, note pads, cheque books, etc had just been piled in there.  It was impossible to find anything.


I started by taking everything out of the drawer.  I then sorted it all into piles, threw out the junk, and took out all the things that shouldn't be in there.


I dug around in my tub of plastic containers and tidied a few of the bits into containers.


Last of all I put everything back into the drawer neatly.


Finally, here's a before and after shot.


I know it's just a small tidy up, but it's made a big difference.
read more "Junk Drawer Tidyup"

01 June 2014

Tidy Kitchen Shelf


A while ago I tidied up my kitchen bench, and removed lots of cookbooks and other mess that had accumulated.  I created my Recipe Box and I also created two clipboards with a weekly planner on one and a menu and shopping list on the other.  This system has been working well for me for the last six months or so.

Lately I have found I want to keep a few more things handy.  I've added a few folders which contain important paperwork for school, some notepads, our pocket money bank, behaviour charts and a jar of washi tape.  All this stuff gradually took over the bench and became really messy again.

This is normally where I'd put a "before" photo, but this project has taken me a couple of months to complete, and I managed to lose my before photo.  I'm really sad, because the difference in the before and after is amazing.  You'll just have to use your imagination.

The easiest solution to getting the mess off the bench, was to put up a shelf.  We used an Ekby Järpen shelf from Ikea, and cut it down slightly to fit in the space.  Once the shelf was installed I set about making everything pretty, colour coordinated and labelled.  I decided on a colour scheme of yellow, turquoise and grey.  There was lots of inspiration online.


I already had my Orla Kiely Recipe Box in yellow.  I gathered some notebooks in grey, black and turquoise.  I also used some washi tape on the spine of my KitchenAid user manual, to make it fit the colour scheme.

I created some patterned paper in PowerPoint in the colours I wanted, then I printed several sheets and stuck them together.  I glued the sheets to some A4 folders, and covered them in clear adhesive book covering film to make them durable.


I had a lockable money box for the pocket money bank.  It was in a bright blue colour and didn't really fit with the colour scheme.


I was willing to buy a new money tin, but couldn't find one in the right size and colour.  Instead I got some grey enamel spray paint and painted the money box.  I started by removing the handle and button lock (the key lock couldn't be removed), then I gave the tin a light sand, wiped it down and covered the key lock with tape.  I gave the box several light coats of spray paint all over and allowed it to dry thoroughly.  Finally I reattached the handle and button lock, added a label, and some adhesive book film to keep the label clean and neat.


Lastly, after searching for ages to find a cute turquoise jar, tin, pot or basket, I stumbled upon this really sweet turquoise and grey pot while I was at the supermarket.  It cost less than £2, and looks great.


Here is my finished kitchen corner, with everything looking pretty and organised.


I love the fact that I have reclaimed my bench space.  I also love that everything I need on a daily basis is close at hand.  I am especially excited that everything is colour coordinated, pretty and has great labels.  This has been a really great project, and has made a huge difference to the kitchen bench mess.
read more "Tidy Kitchen Shelf"

20 May 2014

Origami Bows


I saw these very cute origami bows on Pinterest this week, and really wanted to make my own.  I found the printed tutorial a little confusing, so searched for a video tutorial.  I found this one on Youtube, which is absolutely brilliant.  Each step is shown clearly and I had no trouble making my own bows.


 We had a pack of origami paper in the craft drawer, so I started practicing.  This purple bow was my very first one.


It worked perfectly, however, I did use a glue stick to hold the centre points of the bow in place, and to secure the bow to the two ribbon pieces.  It just make things a bit neater, and stopped the bow popping open every time it was touched.

As Samantha was home sick again today she asked me to make her more bows.  She chose the paper and I obediently folded bows.  This was what we ended up with.


I'm not sure what they'll get used for, but they are very pretty.
read more "Origami Bows"

19 May 2014

Rosie the Hungry Puppy


Samantha was home sick today … however, once the medicine kicked in she was quite perky and wanted to do some craft.  She decided that Rosie was feeling hungry. This is Rosie.


According to Samantha, Rosie really wanted some dog food and a bone … and a nice bowl to eat from.  I raided the craft drawers and found some crepe paper (Samantha insisted on using the pink paper), some craft foam, washi tape and an old plastic milk carton.

I cut the bottom off the milk carton and Samantha decorated it with washi tape.  She then scrunched up the pink crepe paper into balls for the dog food.  I drew a bone shape on the craft foam and cut it out, then stuck it to a second piece and cut it out again.  This made the bone a little bit thicker.

Here's Rosie's delicious dinner.


Now Rosie could dive right in and enjoy her treats.


I think she liked the bone best.


read more "Rosie the Hungry Puppy"

07 May 2014

Sorting Kids Clothes the Easy Way


If you have more than one child, I'm sure you know how much of a pain sorting and folding laundry can be.  It's especially bad when you have more than one child of the same gender.  All those tshirts, leggings and underpants all look pretty much the same when piled into a laundry basket.  It doesn't help that my kids are quite slim and don't fit things marked for their age.  It also doesn't help that sometimes the labels are buried in a side seam, and are impossible to find.

I recently read the most awesome laundry sorting tip. Unfortunately, I cannot find the original post where I read this, despite a lengthy search, but I did find it mentioned in a post on the Amarillo Globe News and on The Daisyhead.

This is how it works … get a permanent marker (I used a black sharpie pen, which I know from experience doesn't come off in the wash) or you could use a tube of fabric paint.  When you buy clothes for your oldest child put a single dot on the label, or on the inside of the neckband/waistband.  When you hand the clothes down to the next child, add another dot, and so on.  If you have four kids, the last child's clothes should have four dots on the labels.

Here's what it looks like:


Now stop for a moment and think about how easy it is to sort the laundry, even if someone who has never seen my kids clothes is helping (right now I'm thinking about my awesome mum and mother-in-law who are so helpful when they visit).  All they have to do is check the dots and they instantly know who it belongs to.  I've added dots to tops, skirts, trousers, leggings, underpants, socks … all their clothes.

This is so easy.  There's no need for labels to ironed or sewn into clothes and no writing names and then crossing them out. This trick is so clever and simple, that it's amazing I have never seen it before.  I can also say, from my very own experience, that it works.  It's only been a week since I implemented this, and already my laundry sorting is a piece of cake.  I hope this tip is as helpful for you as it has been for me.

I'd love to hear any feedback from you.
read more "Sorting Kids Clothes the Easy Way"

11 April 2014

The Great British Sewing Bee - Week Eight Recap


Seven weeks have passed and we've said farewell to seven contestants.  Along the way we lost Cliff, Simon, Julie, Cerina, Jenni, David and Lynda.  So, after all that sewing and crying, here are the grand final contestants.


Image Source - BBC ©

Out of the three remaining contestants, my favourite is definitely Chinelo.  She has flair, creativity, originality and style.  I also love that she does freehand cutting, and doesn't rely on patterns.  Tamara's choices are often a bit outlandish, and I'm not keen on the shapes she creates.  Heather is a very accomplished sewer, but her fabric and pattern choices are often old fashioned and dowdy.  Unlike a show such as Project Runway, this show isn't primarily about design and fabric choices.  It is, at its heart, a show about sewing skills.  This does skew the judging towards the most well executed garments, not necessarily the most fashionable or stylish.  It'll be interesting to see how the grand final episode plays out.

So, armed with a cup of tea and a slice of cake, I'm settling onto the sofa to enjoy the next hour of sewing challenges.

Image Source - GBSB Facebook Page

This week's challenges are all couture based challenges.  There's going to be lots of hand sewing, exquisite finishing, and a focus on attention to detail.

The Challenges 

1. Sewing from a Pattern

Sew a mens silk tie (techniques include working with silk, hand sewing an invisible seam and bar tack) in 3 hours 15 minutes.

The pattern was a basic mens tie.  It was cut on the bias in two sections, and then two additional sections were added to line the tip.  When they announced the challenge, and said the contestants had over three hours to sew the tie, I was thinking it would be a piece of cake.  Seriously, how hard can it be to sew a tie?  Apparently, it's quite tricky!

The fabrics available were not hugely exciting. Heather chose a nice red and orange geometric print, and Tamara chose a nice silver and blue stripe.

Chinelo had great difficulty deciphering the pattern, and could not figure out how to sew the mitred tip of the tie.  After being reduced to tears, Patrick came to the rescue and pointed her in the right direction.

No one deviated from the pattern.  By this stage in the competition, contestants seem to understand that this challenge is all about following instructions to the letter.  They aren't going to get extra points for going off piste and adding their own dramatic flair.  The only person who didn't produced a finished tie was Chinelo, whose tie was still pinned together.

Image Source - BBC ©


The judges comments were:

  • Chinelo - Patrick is pretty disappointed in Chinelo's efforts "we don't have an assembled tie."  The shape of the tie was pretty good. the tip was constructed correctly, but there is no hand sitting.  
  • Heather - the hand stitching was quite untidy with long, uneven stitches.  The body of tie was working properly, the tip was good but a little bumpy, it had been well pressed and the silk was not crushed.  Patrick's opinion - "not bad at all."
  • Tamara - it was a pretty even tie.  The pattern was running perfectly parallel with the corner of the tie, the hand stitching was really good, the tipping was neat, and there was a bar tack (although not neatest Patrick had ever seen).  Patrick - "a wearable piece of mens wear."


The results were Chinelo in third place, Heather in second, and Tamara in first.

Image Source - GBSB Facebook Page

2. Alter a Basic High Street Item

Take a wedding dress and transform it into a special occasion dress for a girl in 2 hours.  

Contestants were given six used wedding gowns to choose from.  Patrick was hoping to see a complete re-imagining of the dresses - not just having them cut down to a smaller size.  Both May and Patrick thought the challenge should be handled sympathetically, and pay tribute to the work that would have gone into the original dress.  These statements were immediately followed by footage of contestants hacking their dresses apart, and discussing how guilty they felt.

If a challenge like this interests you, it's often very easy to pick up an old wedding dress in a thrift store.

The contestants made the following garments:
  • Chinelo - made a classic bridesmaids dress with a circular skirt, fitted bodice with short sleeves, under skirts and re-used some flower embellishments from the original dress.  Her entire dress is drafted from scratch, and looked fabulous.
  • Heather - made a gathered skirt and a simple blouse.  She tried to draft a blouse by draping it on the stand, but ended up having to start again.  Her final blouse was a bit like a pillow case with puffy turn-ins on the sleeves, and  bias edged neckline.  It was very boxy and the sleeves looked unfinished.
  • Tamara - made a dress by cutting down the original skirt.  She then added a simple bodice and hand sewed some gathered tule across the shoulders, and added a bow on the front.  The finished dress looked a little messy and poorly sewn.

Here's a few quick snaps of the three designs:

Image Source - BBC ©


The judges comments were:


  • Chinelo - a fine rolled hem done on the overlocker, beautiful set in sleeves, facing on neck sitting neatly.  May -  "I think that's a really well executed little dress."
  • Heather - a sweet little silk skirt with fabulous gather, but there is no fastening, binding around the neck is good, but a little too square, the sleeve has been left soft.
  • Tamara - there were no edge finishes on this on - they were just cut. The bodice was nicely shaped, and the shoulder straps had been hand stitched onto bodice.

The results are Tamara in third place, Heather in second and Chinelo in first.

Image Source - GBSB Facebook Page

3. Sew a Showstopper

Sew a stunning gown, showcasing couture skills, to fit a real model in seven hours.

Models were best friends of each contestant.  There was much shock and a few moist eyes when the models walked into the workroom.  Contestants were asked to design their own dresses, and were allowed to cut out their fabric at home.

The contestants made the following garments:
  • Chinelo made a figure hugging gown with an invisible mesh bodice covered by hand sewn lace flowers, a fitted satin skirt ending in a tulle fish tail.  Chinelo sewed to the very last minute, trying to get all those lace flowers attached.
  • Heather made a black and red silk gown with a sun-ray pleated front bodice, layers of skirts, a silk bustle and the back finished with a silver chain (that is some part of a horses tack).
  • Tamara made a dress I can't even begin to describe.  It was a lurid floral fabric made into a dress with an empire line waist, stretchy electric-blue racer back, knee length pleated skirt, a layer of printed stretch fabric over the front bodice that had been randomly slashed with a razor and cheap looking fake flowers scattered across the dress (attached by a glue gun).  It was certainly different, completely hideous, and I'm fairly sure that using a glue gun is not a couture technique. 

Here's a few quick snaps of the three designs:

Image Source - BBC ©


The judges comments were:


  • Chinelo - May thought it was a "very beautiful dress, fits your model beautifully", a really successfully execution, fix tail is a bit overpowering, seams on shoulder are a little too robust, a really beautiful looking dress, a lot of work in a short space of time.
  • Heather - the sunday pleating was secured perfectly and stitching was almost invisible, fluted rolled hem is a lovely effect, a lot of hand sewing and gathering, the removable bustle was great, and Patrick liked the plumpness of the bustle, the chain adds a nice edge to quite a soft gown.
  • Tamara - May started by congratulating Tamara on a well inserted zip. The racing back fits beautifully, Patrick and May were sad to see crystal organza not included in the final garment, they were disappointed that the flowers were not hand sewn, and mentioned the slashes were not neatly done.  

The Final Results

The contestants went off for a coffee and past contestants, friends and family arrived in the sewing room to have a look at completed garments.  The eliminated contestants gave their opinions on the likely winners:

  • Cerina didn't want to guess, and thought the judges would have a hard time.
  • Julie had her money on Chinelo.
  • Jenni couldn't decide between Chinelo and Heather.
  • Lynda didn't think she could possibly pick a winner.
  • Simon thought Heather had a spark that might see her win.
  • David was keen to see Tamara win.


The judges discussed the weekend's work and tried to decide who would be the winner of season two.  This is what they discussed:
  • Chinelo - bridesmaid dress was really good, beautiful flair and execution, looked great on her model.
  • Heather - a good job of following the tie pattern, a good bridesmaid dress, her final dress was a real show stopper after weeks of playing it safe.
  • Tamara - a good job of following the tie pattern, a good bridesmaid dress, her couture gown was a great idea, but the execution really let her down.

The contestants were then called back in to hear the results.  After many pauses, and much building of drama, the winner was announced - Heather.  Heather's reaction was really funny.  She was totally expecting it to be someone else, and was completely agog when they called out her name.

Image Source - GBSB Facebook Page

Final Thoughts

This really has been a fun series.  It's got me really excited about sewing, and I've even made a couple of my own Great British Sewing Bee inspired tops.  I hope you have enjoyed the series too.  For those of you who don't know, there is a book out, which includes pattern sheets.  I have heard that The Book Depository have it at a very good price.  I got my copy from Amazon for only £12.

Image Source - Amazon.co.uk

A big congratulations to Heather.  While her choices have often been safe, she is a very skilled sewer, and her final dress really was a knock-out.

Image Source - GBSB Facebook Page


Want to Read More About GBSB?

You might also like to check out these other blogs that have done some posts about this episode:

  • The Thrifty Stitcher - Claire-Louise Hardie is the Sewing Producer for The Great British Sewing Bee, and usually does posts about the patterns used in the first challenge on each episode, and also has some nice posts about techniques used. 
  • Little Black Duck  - Victoria Peat has posted some great links to tutorials that cover some of the techniques you can use to make your own GBSB inspired pieces.
  • The Mighty Mighty Monk Seal - Steve & Chris present a very witty recap, which is written as fans of reality television review, rather than as sewers themselves.
  • Stitch Craft Create - Jen write a short recap each week.
  • The Sewing Directory - each week an episode recap is posted, along with loads of useful links to patterns and techniques.  There is also an archive of recaps from Season 1.

    If you know any more blogs with interesting recaps or useful advice related to the GBSB, leave me a message and I can include a link.
    read more "The Great British Sewing Bee - Week Eight Recap"