27 February 2014

Getting Crafty in the School Holidays - Mini Mosaics

I took a trip to Hobby Craft before the Half-Term holidays began to find some craft ideas to keep us busy.  I found these very cute kits for making tile mosaic coasters.


The kits contain a square of MDF board with the image outline printed on it, a square of double sided adhesive, tiles, grout and instructions.

The coasters were quite simple to make.  I started by sticking the double sided adhesive to the wood, and peeling off the paper to expose the adhesive.  The adhesive is transparent, so you could clearly see the outline of the image.  The girls used the picture as a guide for placing the tiles and began sticking the tiles to the board.


The example in the photograph shows many cut tiles being used to make a nice image.  I tried using a random selection of tools to break the tiles (pliers, grips, hammer, etc), but none of them worked.  What you really need is tile nippers.  If you want to make your coaster just like the example, you'll need to buy a pair of tile nippers (they aren't included with the kit).  Both the girls wanted to be able to cut the tiles and make them fit, so I found this pair of tile nippers on Amazon for £5.98.


I let Olivia have a go at cutting tiles herself (she's a very responsible eight year old) and she did a terrific job.  Samantha pointed out the gaps she wanted to fill, and I cut the tiles for her.  The tile nippers worked brilliantly.  Hardly any pressure was needed to cut a tile.  It went much better once we figured out how to hold the tile, so the two cut pieces don't fly across the room! Samantha also had me do the fiddly part of her giraffe, and she filled in the big sections.

Once all the gaps were filled, we had left the adhesive to cure for four hours


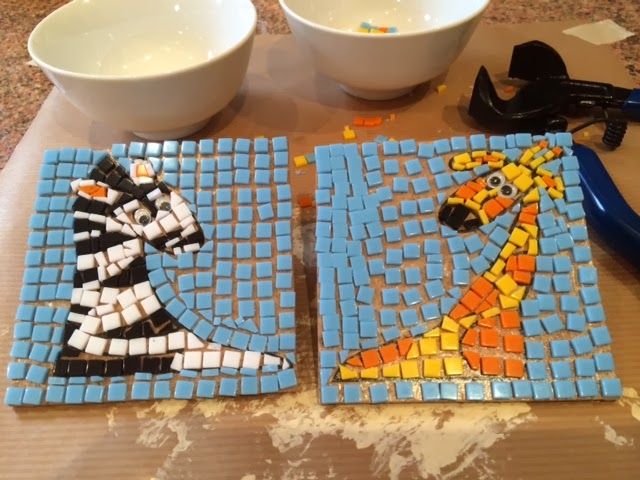
Olivia is neat and precise when she does craft, and you can see that she took a lot of time to make her zebra really carefully.

The next step was grouting. We mixed the grout with water (2 parts grout : 1 part water) and using popsicle sticks and a spatula, we spread it on the tiles to fill in all the gaps.  The girls then used a damp sponge to carefully wipe the surface, until the grout was only in the gaps and the surface was clean.  The coasters overnight to dry properly.

Lastly we painted the back and edges of the MDF board white, so they looked nice and matched the grout.  I also added a coat of clear polyurethane varnish over the paint to seal it.


This was a nice, simple craft activity.  I liked the fact that the kits were so well prepared.  There were plenty of tiles, the adhesive worked well, the design was clearly marked, and all the supplies you needed (except the tile nippers) were there.
read more "Getting Crafty in the School Holidays - Mini Mosaics"

26 February 2014

The Great British Sewing Bee - Week Two Recap

We head into week two with seven contestants left.

Image Source - www.bbc.co.uk
In week one Heather showed herself to be an extremely competent sewer and Tamara showed interesting flair and creativity.  Julie bagged a surprising win last week with her nightgown chosen for best garment of the week.  It will be interesting to see how the contestants manage in week two.

SPOILER ALERT!  I am going to discuss, in detail, what happens in week two of The Great British Sewing Bee.  If you haven't had a chance to watch this episode yet, you might like to sneak off and do that before you read this summary, but please stop by again after you have caught up.

The Challenges 

1. Sewing from a Pattern

Sew a skirt (techniques include box pleats, hand picked zip in side seam, pattern running perfectly across the skirt) in 3 hours.

Image Source - The Crafty Cupboard
The skirt pattern chosen was very similar to the skirt pictured above, by The Crafty Cupboard.  There were two box pleats in the front and the back of the pattern.  There was a lapped zip in the side seam, which needed to be sewn in using a hand stitching technique, and most importantly, the pattern needed to run perfectly across the front of the pleats, around from the front to back panels, and through the waistband.

Tamara chose a lovely sky blue and white floral print, Julie chose a cute orange and yellow elephant print, and Jenni chose a great orange and pink geometric print.  Fabric choice was really important in this challenge.  If the fabric pattern chosen didn't match the size of the pleats on the sewing pattern (I'm going to say pattern far too many times in this recap), then the pleats needed to be adjusted, which would mean the width of the whole sewing pattern would need to be adjusted to maintain overall fit.

Matching up the fabric pattern through box pleats, and adjusting the sewing pattern proved to be a difficult challenge.  Heather seemed the most confident about sewing box pleats.  Chinelo found her fabric pattern very difficult to match, and 45 minutes into the challenge nearly chose a different fabric.  Instead she chose to rotate her fabric 90°, which seemed to make things easier. Jenni did a brilliant job matching up her fabric pattern through the pleats. David focussed on getting his fabric pattern perfectly matched in the pleats, but completely forgot to adjust his sewing pattern resulting in a skirt with a tiny waist.

Matching the fabric pattern through the waistband proved to be another difficult challenge.  Tamara sewed her waistband on backwards, and had to remove it.  Simon, Jenni, Chinelo, and Lynda all had waistbands that didn't quite line up perfectly.

Once again, Julie ignored elements of the sewing pattern and used an invisible zip, rather than the lapped zip, and hand-sewed her waistband instead of topstitching it.  Lynda also added an invisible zip, but ended up unpicking her zip and using the method specified in the sewing pattern.

The judges gave their most positive comments on Heather's spot on fabric pattern matching, lovely even zip stitches, Tamara's very well lined up fabric pattern with a difficult fabric choice, David's perfectly matching fabric pattern through the pleats and Cerina's nice zip and good sewing overall.

Their most negative comments were on Julie not following the pattern (again), David's sewing pattern not being adjusted and the skirt not fitting, and Simon's pattern matching not being good enough.

The results from 10th place are Julie, Simon, Jenni, David, Lynda, Chinelo, Cerina, with Tamara in second, and Heather in first (for the second week in a row.

Image Source - GBSB Facebook Page
Personally, I'm not sure I could have made a perfect skirt in three hours, and I'm very impressed that so many of the contestants did such a great job.

2. Alter a Basic High Street Item

Take two mens shirts in different patterned fabric and turn them into one garment it in 1.5 hours.  

The contestants were given 50+ shirts to choose from.  They could cut them up, and combine them in any way they wished.  The judges were looking for a good combination of fabrics, and an interesting design.  What they really don't want to see, is a shirt cut down with a band of different fabric added to it.

Lynda and Cerina decided to make a child's dress.  Heather, Julie and Simon decided to make shirts.  Chinelo made a bustier, and Jenni and Tamara made skirts.  Some of the fabrics chosen looked really dubious (especially Simon's, David's and Tamara's).

Cerina made good use of her fabric and made a very sweet child's sailor style dress.  Jenni's skirt was reminiscent of the first challenge, with box pleats in the back, however she made nice use of her fabrics.  Chinelo's bustier was simple but cute, with a lovely bow detail.

The judges gave their most positive comments on Chinelo's great bustier and beautifully placed bow, Cerina's good choice of fabrics and trim, and May was blown away by Tamara's amazing skirt.

Their most negative comments were on Heather and Simon's simple transformations, and David's choice of fabrics.

The results from 10th place are Simon, Heather, David, Julie, Jenni, Lynda, Cerina, with Chinelo in second and Tamara in first (for the second week running).

Image Source - GBSB Facebook Page
Patric summed up Tamara's work in this challenge when he said the original shirt was "probably one of the foulest shirts ever to grace a humans body, and you've transformed it into something that looks, really, very modern and very cool looking."

3. Sew a Showstopper

Sew a pair of mens pyjamas in a patterned fabric to fit a real model in 6 hours.

Image Source - GBSB Facebook Page

What I like about the challenge

There were some interesting fabric choices.  Jenni had a gorgeous black and white moustache and pipe print fabric, Cerina had a lovely William Morris blue floral fabric, Heather had a nice, bold red and white stripe, and Lynda had very nice pink, red and blue stripe.  Tamara had a crazy newsprint fabric that looks very difficult to match up.

A majority of contestants went for a traditional pyjama, with pocket detail, a collar and piping trim.  Chinelo went for a very simple short pyjama pattern, with no collar or fly, but aimed to produce a perfectly executed garment, rather than a complicated one.

The highlight of this challenge for me was the use of piping in most of the pyjamas.  I've only tackled piping in two pairs of shorts, and it isn't something that's easy to do.  I can't even wrap my head around how you get the piping perfectly neat around the corners in the collar.  The lowlight was Tamara's satin piping trim.  Rather than traditional piping, she used a wide border of satin bias tape that just didn't match her fabric.

The judges gave their most positive comments on Heather's perfect matching of the stripe pattern, Jenni's very neat piping , Julie's crisp, even collar, Chinelo's perfectly executed work, Lynda's very good piping, pattern matching and great use of fabric stripe running in opposite directions on collar.

Their most negative comments were on Tamara's very big piping and fly sewn shut, Simon's collar lapels on even and pocket not lined up, and Heather's button placement wrong and front edges not lining up.

The Final Results

The contestants went off for a coffee, while the judges discussed the weekend's work.

Those in danger were:

Simon - he had two weak challenges on day one, but his pyjamas were not terrible.
David - his pleated skirt didn't fit, his shirt transformation didn't quite work, but his pyjamas were quite good.
Julie - her pleated skirt didn't fit well, her shirt transformation was reasonable, but her pyjamas seemed well received.

The contestants were then called back in to hear the final results:

Garment of the week went to … Lynda for her mens pyjamas.

Image Source - GBSB Facebook Page

The contestant leaving this week was … Simon.

Image Source - GBSB Facebook Page

Final Thoughts

Simon was clearly less experienced than most of the contestants.  His work did not have the same polished finish and flair.  Having seen the work of the male contestants over the first two weeks, I strongly suspect we are going to see an all female competition before long.  Let's hope David can improve his standing next week.

Up next week is knit fabrics.  Personally I'm very excited by this, as I've recently taken the plunge and started trying to master knits.  Hopefully I'll pick up lots of good tips next week.

Want to Read More About GBSB?

You might also like to check out these other blogs that have done some posts about this episode:

  • The Thrifty Stitcher - Claire-Louise Hardie is the Sewing Producer for The Great British Sewing Bee.  She posts some lovely tutorials on sewing techniques.
  • Little Black Duck  - Victoria Peat has posted some great links to tutorials that cover some of the techniques you can use to make your own GBSB inspired pieces.
  • Sew Sensational - Louise posts great links to patterns used in the episode, or similar to those used.
  • The Mighty Mighty Monk Seal - Steve & Chris present a very witty recap, which is written as fans of reality television review, rather than as sewers themselves.
If you know any more blogs with interesting recaps or useful advice related to the GBSB, leave me a message and I can include a link.
read more "The Great British Sewing Bee - Week Two Recap"

20 February 2014

Getting Crafty in the School Holidays - Ribbon Wands

This was one of those very quick craft activities, that made use of some supplies we had laying around the house.  Samantha had accidentally torn an organza ribbon off one of her dresses, and was running around the house waving it about.  I took the ribbon away, and she asked me if she could have her own ribbon wand to play with.   It seemed like something easy to make, so I grabbed a few supplies.

I used a piece of dowling cut into 40cm lengths, three colours of organza ribbon cut about 50cm long each, a push pin, some washi tape, stickers and marker pens.

The girls each decorated their dowling using the washi tape, stickers and marker pens.  I then neatly folded the ends of the ribbons together.  I used the push pin to secure the ribbon to the end of the dowling.  Ta da … ribbon wands.


This is a craft you could make even fancier by painting the sticks, using glitter, adhesive gems, or any number of embellishments, but this simple version worked well.  The wands have been a hit with the girls, and we made a couple extra today when friends came over.
read more "Getting Crafty in the School Holidays - Ribbon Wands"

19 February 2014

The Great British Sewing Bee - Week One Recap

Eeeeee!  Sewing on a popular, mainstream television show.  I'm so excited, and have decided to have a go at doing a weekly roundup.

Season two is going to be bigger than season one - eight episodes, 10 contestants.  I must admit, I nearly applied to be a contestant on the show, but I didn't think I'd be experienced enough.  Now that I've seen the first episode, I can't help thinking I'm just as experienced as some of the people chosen.

The Contestants


Image Source - The GBSB Facebook Page

Left to right, they are: Julie, Lynda, Heather, Cerina, Simon, Chinelo, David, Tamara, Jenni and Cliff (not in this picture).  At this point in the competition I haven't really got a feel for the contestants.  What has stuck in my mind so far is that Lynda is hearing impaired and has a signing interpreter, Simon comes from a textile mill background, Chinelo mostly sews by drafting directly onto fabric with chalk (yikes!), David is a policeman and Cliff is a retired buddhist prison chaplain.  I'm sure we'll get to know them more as things progress.

Spoiler alert … this is where I'm going to start talking about what happened in week one.  If you don't want to find out what happened, stop reading now!!  You're always welcome to drop by again, once you've caught up on your viewing.

The Challenges 

1. Sewing from a Pattern

Sew a sleeveless cotton blouse (techniques include sewing darts, clipping seams, using under stitching on the neckline, hand sewing button loops) in 2.5 hours.

Image Source - The Thrifty Stitcher

The pattern chosen was surprisingly simple.  A sleeveless blouse, with a facing.  When they did an overview of the pattern I was thinking that everyone would find it easy.  It was interesting seeing several contestants struggling with some fairly basic techniques.  Chinelo doesn't usually work with patterns, Simon didn't know what under stitching was, and Julie couldn't figure out how to turn the back pieces through the facing.

There were some lovely fabric choices.  I especially liked Jenni's bold print, Tamara's bright geometric print, and Simon's mini polkadot paired with a bright floral.  I liked both fabrics that Chinelo chose, but they were an odd combination together.

As we progressed through the make, a couple of contestants started deviating from the pattern.  Julie decided to skip the under stitching, and Tamara added embellishments and used a fabric loop rather than the hand stitched button loop.  Why do contestants decide not to follow the instructions, in a challenge that's all about following the instructions?

The judges gave their most positive comments on Cerina's perfect under stitching, neat button loop, and perfectly aligned centre back opening, Heather's exquisite under stitching, and well done hand sewn loop, and Jenni's perfectly centred pattern on her front panel (I couldn't help noticing that she hadn't matched the horizontal pattern between the front and back sections).

Their most negative comments were on Julie's missing under stitching, Cliff's unfinished garment with pins still in the hem, Chinelo's pattern not lined up symmetrically, and button and loop missing, David's wonky neckline and untidy hem, Simon's under stitching not close to seam, untidy hem, puckered back seam, and no button or loop, and they felt Tamara wasted time doing things she wasn't asked to do by adding trim on centre back seam, and bow on front.

The results from 10th place are Cliff, Simon, Chinelo, Linda, Julie, Jenni, Tamara (lost points by doing extra things, instead of what she was asked to do), Cerina in second, and Heather in first.

Picture Source - GBSB Facebook Page - Heather's winning garment

2. Alter a Basic High Street Item

Take a basic woollen maxi skirt and transform it in 1.5 hours.  

The skirt provided was an A-Line maxi skirt, with a narrow waistband, in a grey, medium weight wool fabric.  Every contestant began by chopping off about half of the length.

Lynda, David and Cliff inserted godets into their skirts using a contrasting fabric.  Godets can look amazing (like this skirt by LiEr at Ikatbag), but David and Cliff's versions just didn't work.  The fabric choices were slightly odd, and didn't work with the medium weight wool.  They just ended up sticking out and flapping around strangely.

Simon cut out a large, off-centre triangular section and filled it with a pieced section of woven woollen fabrics, as well as a "post box pocket" (a double bound welt pocket).  It was a really interesting approach.  Chinelo cut a peplum in a different fabric and stitched it onto the top of the skirt.  Tamara created a pleated "paper bag" ruffle out of the main fabric and a bright floral fabric, and trimmed it with a grosgrain ribbon.  Cerina created a narrow ruffle out of the main fabric, sewed it onto the hem and trimmed with a ribbon.  Heather added a box pleat in the back seam in a nice blue wool, and some grosgrain ribbon trim around the hem.  Julie added a band of contrasting fabric to the hem, and a patch pocket trimmed in the contrast fabric. Jenni made some straps and turned her skirt into dungarees, with a trim of orange ribbon on the hem and some buttons.

The judges gave their most positive comments on Julie's use of a good contrasting fabric, Simon's use of contrasting, woven woollen fabrics in the off-centre triangle, and the nice pocket detail, Chinelo's well balanced and neat peplum, Julie's box pleat, Tamara's bohemian ruffle.

Their most negative comments were on David's off-centre silky godets that looked a bit like ears, Cliff's godets in a pastel, floral cotton fabric that didn't match, and untidy trim on the waistband, Julie's and Jenni's overly simple transformations.

The results from 10th place are Cliff, David, Julie, Heather, Cerina, Jenni, Lynda, Simon, Chinelo in second and Tamara in first.

3. Sew a Showstopper

Sew a silk nightgown to fit a real model in 5 hours.

I liked this challenge because nightgowns can be beautiful, there are plenty of variations to choose from, you can embellish with beautiful lace, and it uses silk.  Silk, much like knit, scares me.  I've never sewn with it, but after watching this challenge, I'm seriously thinking about having a go at making a nightgown.

The highlight of this challenge for me was Chinelo drafting straight onto the fabric, and creating an incredibly beautiful and almost perfectly fitting nightgown.  The lowlight was Simon's appalling choice of fabric with a shot silk dupion that looked like it should be made into a cocktail dress, rather than a nightgown.   Some contestants struggled to work with the silk.  This is one of the things that scares me about working with silk.

Cliff became sick half-way through this challenge and made the decision to withdraw from the competition.

The judges gave their most positive comments on Heather's well fitting nightgown and hand sewn lace,  Lynda's lettuce edge hem, design of the lowered back, use of lace and diamonte, Chinelo's terrific fit, use of laced back, self drafted design, and David's perfect fit, and beautifully done lace trim.

Their most negative comments were on Simon's stiff fabric, and finished look more like a dress than a nightgown, Cerina's major fit issues with centre seams not perfect, panels not sitting in the right place, and lace not sewn adequately, Tamara's bust verging on slightly indecent and overhandled fabric that had stretched, and Jenni's baggy, puckered fabric.

The Final Results

The contestants went off for a coffee, while the judges discussed the weekend's work.
Those in danger were:

Simon - his skirt alternation rated highly, but his sleeveless shirt was described as "untidy", and his nightgown as "just awful".
David - he didn't impress on the first two challenges, but his nightgown really redeemed him.
Jenni - her nightgown was "all over the place".

The contestants were then called back in to hear the final results:

David received a special commendation for coming close to winning this week (which I presume was entirely down to his very well executed nightgown).

Garment of the week went to … Lynda for her nightgown.

Picture Source - GBSB Facebook Page
The contestant leaving this week was … nobody.  I can only presume this was due to Cliff leaving the competition due to illness.

Final Thoughts

I like this new version of the GBSB.  I like that there are more contestants, more episodes, and that the format is a little slicker than season one.  I like the new venue, which is brighter and roomier than season one.  So far I've enjoyed the challenges.  I'm very inspired to make my own sleeveless blouse.  I'd like to set the timer for 2.5 hours and see how I go.  I'm also keen to have a go at making my own silk nightgown.  I don't think I can challenge myself to my own sew-along (especially as we are in the middle of half-term school holidays), but I'm definitely looking forward trying some new challenges.  Can't wait for next week.

You might also like to check out these other blogs that have done some posts about this episode:

  • The Thrifty Stitcher - Claire-Louise Hardie is the Sewing Producer for The Great British Sewing Bee.  She posts some lovely tutorials on sewing techniques.
  • Little Black Duck  - Victoria Peat has posted some great links to tutorials that cover some of the techniques you can use to make your own GBSB inspired pieces.
  • Sew Sensational - Louise has posted a great list of patterns used by contestants for the nightgown challenge, as well as a link to a similar pattern for the sleeveless blouse.
  • The Mighty Mighty Monk Seal - Steve & Chris present a very witty recap, which is written as fans of reality television review, rather than as sewers themselves.
read more "The Great British Sewing Bee - Week One Recap"

16 February 2014

A Tiny Post on Duck Tape

I was asked to repair a down vest jacket for my brother-in-law.  It got a few holes burnt on the inside of the jacket when he hung it over an outdoor light at our place.  Initially I used some sturdy lining fabric and made a large patch.  I stitched it on using tiny ladder stitches.  It was really neat and patched the holes well, but the down started leaking out around the edges.  I offered to have another go at it today.

After some thinking (and googling) I decided to try using Duck Tape to seal the holes.  I started by unpicking the patch and cleaning up all the loose down.  There were three holes in the jacket.  I cut neat circular patches, slightly larger than each burn hole, then covered the holes.  I firmly pressed down the edges of the tape to make sure they were properly stuck in place.  Finally I re-stitched the fabric patch in place.  The Duck Tape patches looked really neat, but I wanted to cover the area, as some of the fabric around the holes was a little crispy feeling.  The repair seems to have worked well, and the down is definitely sealed inside the jacket.  I'll be interested to see how the tape holds up in the long term.

Sorry, no pictures with this post.  I only thought about writing a quick post after I got home!
read more "A Tiny Post on Duck Tape"

09 February 2014

Adorable Wooden Bead and Felt Roll Necklace

When we were in New Zealand, my Mother-in-Law had organised a craft activity for the kids.  She found it in a copy of Women's Weekly and had stashed it away for when we next visited.  This was the article:


(Disclaimer! - I need to apologise for the terrible photos in this post.  While we were doing this activity I only had my really old iPhone handy, so these were taken in awful light with a rubbish camera.) 

The process for making these necklaces is quite simple.

1. Glue two squares of felt together using a glue stick.
2. Cut the felt sandwich into strips (1.5cm or 5/8"wide)
3. Roll the strips up and sew the end down.
4. Thread the felt rolls and wooden beads onto a length of embroidery thread using a needle.

These were the pictures of the steps posted with the article.


It seemed really straight forward, and I thought the girls could do a lot of the work.   We had no problem with the first step. The girls enthusiastically glued the felt together and left it to dry.  Nana then used her rotary cutter and quilting ruler to cut the strips.


The girls then started rolling up the strips and glueing down the ends.  We thought glueing would be so much easier than sewing … this is where the trouble began.  The glue wouldn't hold the rolled up felt in place and they kept unrolling.  We tried a couple of methods to hold the rolls while the glue dried - we stabbed some with a pin, and used a small piece of masking tape on others.  Both methods worked OK.  We should probably have followed the instructions and sewed the ends!  Nana and I ended up finishing all the rolls while the girls went and played.  So much for a craft activity for the girls!!


Once we had the rolls ready, we threaded up a couple of strong needles with a length of embroidery thread, and called the girls.  The idea was to push the needle through the roll of felt (from side to side, through all the rolled layers), then add a bead, then repeat the process until the necklace was long enough.  Unfortunately this also turned out to be far more difficult than it looked.  The felt seemed to have a very tight weave and the needles just refused to go through the layers of felt.  We ended up having the girls choose a roll of felt, then my husband and I forced the needle through the roll.  This involved much white-knuckled pushing of the needle, then using a hard surface to brace the needle and slowly shove the felt down the length of the needle.  I'm not going to lie, it was a difficult process.  The girls then threaded on the bead and chose the next felt roll.

In hindsight I think it would be a good idea to choose a wool felt that doesn't have as tight a weave.  Very thin, tightly woven, synthetic felt just wasn't suitable for this activity.  Fortunately the end result was really pretty.  The girls proudly wore their necklaces on holiday.


Although this activity turned out to be far more difficult than we anticipated I'm really glad we did it.  With a couple of adjustments, I'm sure this would be much easier to make.
read more "Adorable Wooden Bead and Felt Roll Necklace"

07 February 2014

Sewing with Knit - My Scary First Step

Yesterday week I finally achieved something I've been wanting to do for a long time.  I sewed a knit fabric … I made a tshirt.  I don't know why, but knit fabrics have always scared me.  I was finally inspired to take the plunge when I found this tutorial by Ask Sarah.  I'd thought about drafting my own tshirt pattern, but it just seemed so overwhelming getting the fit right, and dealing with negative ease and other thoroughly baffling drafting concepts.

I started with a favourite tshirt, and used Sarah's technique for creating a pattern on paper.  I took photos of this step, but managed to lose them before I could upload them.  I thought about recreating the photos to include in this post, but Sarah already had some really clear photos of this step.  This is what the carefully pinned tshirt looked like …


Once I had the pinned outline, I used my drafting ruler to carefully mark the lines then add seam allowance (3/8" for the seams and 1" for hem on body and sleeve).  I bought a lovely knit fabric from Rolls and Rems in Holloway.  Just to make things complicated, it is a stripe!  In hindsight, this was a bit silly.  It was also a really light, soft, fluid knit, which was REALLY silly to choose.  I carefully folded the fabric (trying to line up those stripes), then I pinned and cut the pattern pieces.


As you can see from the above photo, the stripe was really hard to line up.  I ended up with the stripes very slightly off kilter.

Before we get onto the sewing part, I thought I'd share a photo of how I like to work when I'm sewing. I don't have a dedicated sewing space, and usually set up on one end of the dining room table.  This picture shows my overlocker (serger) on the table, with my usual sewing tools I like to keep handy.


I drop all my scraps of thread and fabric into that little plastic box as I sew.  It keeps things really neat.  If I'm doing something that generates a lot of scraps, I keep a waste bin under the table, but this is usually big enough.

Once I had all the pieces cut, I sewed the front and back pieces together at the shoulder seams.  For posterity, I've included a photo of my very first knit seam …


My overlocker seemed to work really well with this fabric.  It wasn't pulling or puckering, and I only had to make some minor adjustments to tension.  If you are having trouble with tension, this tutorial by Make it Handmade is really handy.  It is also helpful to look at your own overlocker's user manual.

Once the shoulder seams were done, I cut a strip of fabric 1.5" wide to be the neckband.  the stretch runs along the length of the fabric (not the 1.5" width).  I used this brilliant video tutorial from Threads Magazine for attaching the neckband.  I really wanted to have the strips in the neckband going in the opposite direction to the body of the tshirt, but unfortunately the fabric only stretched in one direction.  Again, not a great choice of fabrics.  As the fabric was so flimsy and hard to control, my neckband is a bit wonky.


The next step was to attach the sleeves.  I marked the front of the sleeve using chalk, just to make sure I attached it to the correct side of the tshirt, then I pinned and overlocked the seam.  The pattern I drafted from my original tshirt was slightly different to the front and back of the sleeve.  I'm not sure if it's supposed to be like this, but it's how mine turned out.


I pressed my seams and turned the tshirt inside out.  I then overlocked the seams on both sides from the end of the sleeve, to the armpit, then down to the hem.  This was really exciting, because it was almost a tshirt.  I resisted the temptation to try it on and moved onto the hems.  The hems were a bit frustrating to sew.  I've never used a twin needle before and I had trouble getting the tension and stitch length right.  I googled a few tutorials and found that a long stitch length was recommended and this seemed to work better.  I found the fabric between the two stitch lines puckered a little, but it pressed out OK.


The hem isn't perfect, and I'd really like to see how this works on a more stable knit fabric.  It was probably, again, down to the fabric choice.

Here's the finished tshirt:


The fit turned out a bit tighter than I had planned, and there's something slightly funky going on in the underarm seam, but overall it turned out well.  I would wear this, but I'm not completely in love with it.

All up this project took me about four hours.  Drafting the pattern took about two hours, and the cutting and sewing took about two hours.  In reality this project has taken me about four months.  I bought the fabric way before Christmas and drafted the pattern in a burst of enthusiasm.  I then kept eyeing that fabric and thinking how difficult it was going to be.  It was such a soft, fluid knit that I knew it wasn't going to behave itself.  In truth, it wasn't too bad.  The neckline was the most difficult part, closely followed by lining up those stripes.  I definitely want to sew with knit again, perhaps perfect my tshirt pattern, but I will definitely choose my fabric more carefully next time.
read more "Sewing with Knit - My Scary First Step"