A couple of weeks ago Karen from Did You Make That wrote a post about the making of her Charlie Caftan.
 |
| Source - Did You Make That |
I wasn't drawn to the pattern immediately as I didn't like the length of it or the fit of the bodice, but then I clicked on the link to the pattern and found this ...
 |
| Source - Closet Case Files |
I absolutely adore this longer version. It also looks like the perfect dress for sticky Singapore weather.
Several months ago my mum was visiting me in Singapore. We spent a few hours wandering around Arab Street and did a bit of shopping. I spotted this lovely hand printed, Indian cotton fabric in Dilip Textiles. They mostly sell tablecloths and cushion covers, but they also have a small selection of pre-cut fabric lengths.
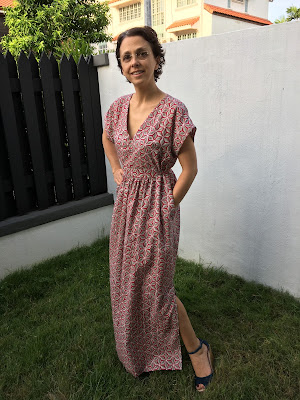
I had slightly less than 3m of fabric, and was able to cut a size 3 pattern. I had to take about 1" off the length to fit it in, but as I'm rather short the length worked out perfectly! The fabric is a soft, lightweight cotton (a bit heavier than a lawn).
While I love this fabric, I wouldn't recommend using geometric print. I especially wouldn't recommend a hand-printed Indian cotton where the geometric pattern is slightly wonky. It adds an unnecessary level of complexity in matching up that incredibly visible centre front seam. That being said, I think the minor imperfections just add to the charm of this fabric.
There are a couple of tricky parts in the construction of this dress. The first is getting a neatly aligned centre front seam. I started by taking extra care when folding the fabric and placing the pattern piece. Once the front panel was cut, I carefully staystiched the neckline to ensure I didn't stretch it out while I was working. I then pinned the seam and checked the alignment. It took several goes, but I eventually got it lined up perfectly. I'm pleased I took the time to do this carefully, as it would have been horribly obvious if I'd got it wrong.
Those of you with eagle eyes may have picked up that this isn't actually a perfectly aligned seam, as the pattern doesn't meet perfectly on the centre seam. The only way I could have achieved perfect pattern matching would have been to take 2-3cm out of the gathered portion at the cutting stage, so that the repeating pattern met along the white dots in the centre of the star. Personally, I quite like the way it worked out.
The second difficult step is the insertion of the "waistband" panel in the centre front. I started by very carefully lining up my pattern piece so that I got a good placement of the star design in the fabric. The pattern instructions for inserting the waistband are a little bit confusing. Fortunately, Karen had shared her tips on how to complete this step, and it ended up being quite straightforward. I drew the stitching lines on the back of waistband panel using my trusty Frixion pen.
I then carefully pinned and sewed the waistband into the bodice using the markings as my stitching guide. It resulted in a really neat waistband panel. The rest of the instructions for the dress are really simple, and I had my Charlie Caftan completed in about three hours.
Here's the finished dress:


No comments:
Post a Comment