Our Lego collection has been steadily growing in the past couple of years. I wanted to come up with a Lego storage solution that would be easy to access and, most importantly, neat and tidy. When I talked with the girls they were adamant they wanted their Lego sorted into the original sets. I spent a good week sorting the lego into sets, putting them into containers and adding a label to the lids showing which set the pieces belonged to.
It was great … until the girls made up several sets, pulled them apart and jumbled the pieces together. There was no way I was going to sort all that Lego out again.
Eventually I convinced the girls that it would be a great idea to store the Lego by colour. This was our inspiration:
 |
| © iheartorganizing |
While I love the IKEA Trofast storage shelves, there just isn't enough space to add extra shelves in the playroom. We already have two IKEA Expedit bookshelves (no longer available, replaced by IKEA Kallax), and there's plenty of space in them to accommodate the Lego. Those six compartments in the circle are where the new Lego storage is going to go.
It's not a great view, but you might be able to see that all those small containers of Lego sets are in the two bottom right compartments I've circled. I've also got some Trofast tubs in the two bottom left compartments. I had to put lids on the tubs so that I can stack them.
What I wanted to do was add rails of beading on each side of the compartments so that I could slide the Trofast tubs into the compartments. Unfortunately, each compartment is approximately 2cm too wide for the tubs.
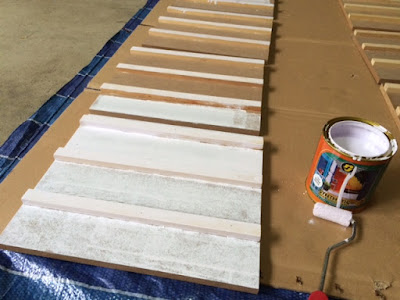
Eventually, I decided to add a piece of 10mm MDF on each side of the compartments to fill in the gap. I bought my supplies from Ban Heng Long Trading (near Little India), and I would totally recommend them if you need any DIY supplies. You can email them and arrange to have wood pre-cut, and then you just have to pick it up. It was a zoo when I visited, so having the wood already cut was very helpful. They cut the MDF to the exact measurements of the sides of each compartment. I cut and attached wooden beading on each panel using PVA glue and small nails.
The next step was to paint the panels with white gloss enamel paint.
It took MANY coats of paint to get really good coverage, especially on the ends. After several days of slowly adding coats of paint, the panels were ready. My husband drilled two pilot holes into the panels, then attached them to each side of the Expedit compartments using screws.
The stark white of the new panels is a bit of a contrast to the slightly yellowed shelves, but I can live with that. I used PowerPoint to make up some colour labels, then I attached them to the Trofast tubs using clear book covering adhesive. The girls then helped me sort all the Lego into colours, and we slid our tubs back into the shelves.
What's the verdict? Since I installed the new colour sorted Lego tubs, the girls have been on a Lego building frenzy. I don't even want to show you a picture of the playroom! They've both told me that it's so much easier to make a Lego set now. They have no problem finding the pieces they need, they can pull out tubs and keep them handy while they're building. This has been a great success.


This was such a fun read, and I really love your DIY version of the bin holders. Thank you for sharing!
ReplyDeleteThanks Jen.
DeleteHi Katie. I love this so much and will be implementing something similar in my son's room; thank you so much for the inspiration!! What are the dimensions of the "wooden beading" you used? Do you have a link? Thanks, Bethany
ReplyDeleteThanks Lorraine. The wooden beading I used measured 1.3cm x 2.3cm (about ½" by 1¼"). I don't have a link. I bought it in a random wood shop, down a side street in Singapore!
DeleteWhat are the measurements you used for where to attach the beading to the mdf? Thanks!
ReplyDeleteThe beading measured approximately 15mm x 10mm. I attached the longer side to the MDF panels, and it gave me a 10mm support for the Trofast tubs.
DeleteI am attepmting this hack today! So excited as the Trofast units are expensive and we already have a Kallax unit!
ReplyDeleteAwesome blog. I enjoyed reading your articles. This is truly a great read for me. I have bookmarked it and I am looking forward to reading new articles. Keep up the good work! Luggage storage Paddington station
ReplyDelete